Article Contents
Автоматичні вимикачі для освітлення (6–10А) та розеток (16–25А): як вибрати і купити


Key Takeaways
- For lighting: 6–10 A with trip curve B (for resistive loads such as LEDs).
- For outlets: 16 A (less commonly 20–25 A) with trip curve C (mixed loads with inrush currents).
- Key parameters: match the rated current with the cable cross-section (1.5 mm² for lighting, 2.5 mm² for outlets) and breaking capacity (6 kA for apartments).
- Important: the circuit breaker protects the cable from overheating, not the connected appliance.
Hi, I'm Oleh Lukianchuk, a technical training engineer at UEC. With over 12 years of experience in electrical engineering, I have designed hundreds of distribution panels — from residential to industrial.
In this article, we'll cover how to properly choose a circuit breaker for lighting and outlets: from calculating the rated current to comparing brands and common installation mistakes.
Popular Circuit Breakers for Homes and Apartments
As a technical training engineer at UEC, I deal with panel configuration requests every day. Below, I've compiled proven models that have passed our internal tests for compliance with declared current characteristics. You can filter them by parameters to quickly find the optimal option for your specific circuit.
Product Cards
At UEC, we perform incoming batch inspections, and for example, the GEWISS 1P 10A B breaker demonstrated stable operation in our office network with a 1.8 kW load on LED luminaires, without causing nuisance tripping.
Which Breaker to Install for Lighting: Selecting Rated Current and Trip Curve for a Lighting Circuit
For a lighting circuit in a modern apartment, a 6A or 10A circuit breaker is most commonly installed. This choice is dictated not so much by the power of the light bulbs (modern LEDs consume very little), but by the cable cross-section. The standard for lighting is 1.5 mm², which needs reliable protection from overheating. The approach is simple: calculate the load, convert it to amperes, and choose the nearest rated current.
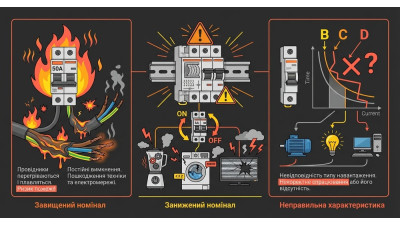
For purely resistive loads (incandescent lamps, quality LEDs without extreme inrush currents), trip curve B is optimal. It is more sensitive and will trip faster during a short circuit on a long cable run. If you have a large group of luminaires with capacitive drivers that produce a brief current surge at startup, electricians more often choose trip curve C to avoid the situation where lights "trip" when switched on.
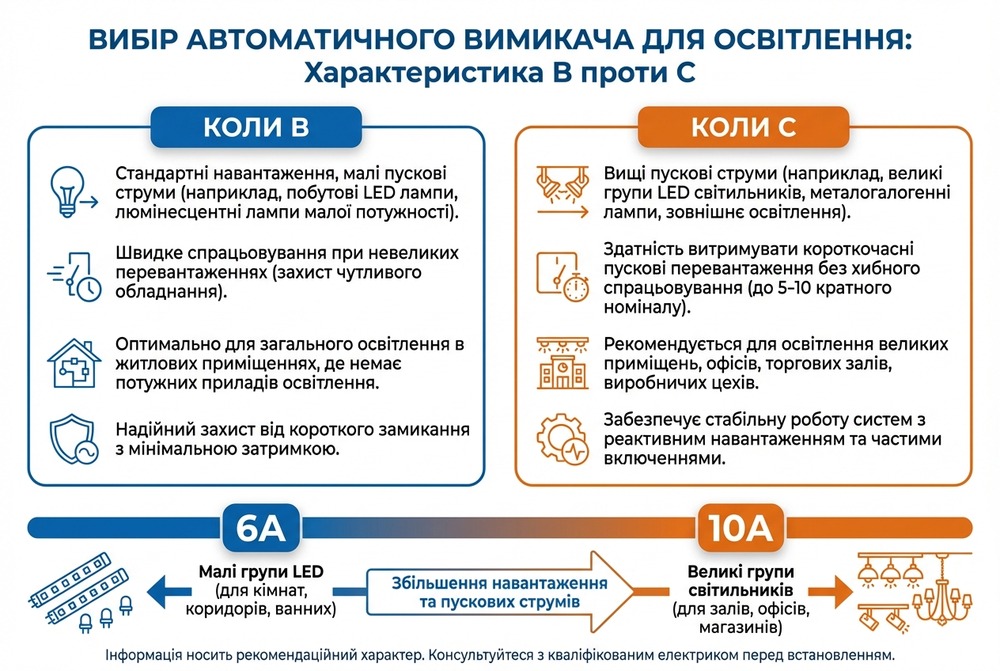
From my experience on the railway, where reliability is critical, we always calculated inrush currents. The same rule applies in residential settings: if you're putting 20 LED luminaires on a single switch, their total inrush current may exceed the 6A rating. In that case, consider 10A. We've covered more about which breaker to choose for outlets and lighting in a separate guide.
"Load characteristics such as motor, fluorescent lighting, or LED directly affect the selection of the trip curve"
— Electrical Installation Guide [2]
Ignoring the load type is one of the reasons why functioning breakers trip "for no reason."
How to Select a Breaker for Outlets: Power Calculation and Rated Current for an Outlet Circuit
The gold standard for a residential outlet circuit is a 16A circuit breaker with trip curve C. This solution is based on the use of copper cable with a 2.5 mm² cross-section, which is standard for outlets.
To accurately select a breaker, perform a power calculation:
- Add up the power of appliances that will operate simultaneously (for example, electric kettle 2000 W + microwave 1200 W = 3200 W).
- Divide by the mains voltage (230 V): 3200 / 230 ≈ 13.9 A.
- The nearest standard rating that exceeds the calculated current but protects the cable is 16A.
If the total power is significantly higher or you plan to connect high-power appliances (instantaneous water heater, cooktop), a dedicated circuit with a 20A or 25A breaker may be required, but this is only possible if the cable cross-section is 4 mm² or larger.
⚠ Engineer's tip: If the breaker keeps tripping, the cable is getting hot, or you have old aluminium wiring — don't try to solve the problem by installing a "more powerful" breaker. That's a direct path to a fire. Contact an electrician for diagnostics.
When designing kitchen circuits, I often recommend splitting the lines. For example, the kettle and toaster on one 16A group, and the dishwasher on another. As noted by Weisho Elec, for multiple motors (for example, in household appliances), it's important to account for the total running current plus the inrush current of the most powerful motor [3].
Why 10A for Lighting Instead of 16A (and When to Use 6A)
Protection Logic: The Breaker Protects the Cable, Not the Light Bulb
The main rule of electrical engineering that beginners often ignore: the rated current of a circuit breaker is selected for the weakest link in the chain. Most often, this is the cable.
| Circuit Type | Typical Copper Cross-Section | Recommended Breaker |
|---|---|---|
| Lighting | 1.5 mm² | 6A or 10A |
| Outlets | 2.5 mm² | 16A |
| Heavy-duty circuits | 4.0 mm² and above | 20A, 25A, 32A (as calculated) |
To understand which specific model to choose for your case, I recommend reviewing our breaker selection table by cable cross-section and power.
When 6A Is More Appropriate Than 10A
The 6A breaker is becoming increasingly popular thanks to the energy efficiency of LED technology. It makes sense in the following cases:
- Small lighting groups: for example, a bathroom or pantry where the total power does not exceed 300–500 W.
- Long cable runs: if the cable stretches over 50+ meters (for example, outdoor lighting), a lower-rated breaker will react faster to a short circuit at the end of the line.
- Old wiring: if the insulation condition is questionable, a lower cut-off current provides additional safety.
When 16A for Lighting Is a Bad Idea
Installing a 16A breaker on 1.5 mm² cable is a serious mistake. Cable of this cross-section can continuously carry about 18-20A (with open installation), but inside a wall, heat dissipation is worse. A 16A breaker will conditionally not trip even at 18A current for an hour. This leads to insulation degradation and fire risk.
"Overrating is the top mistake of self-taught electricians. They think: 'I'll put in 25A so it definitely won't trip.' But as a result, the cable works as a heating element inside the wall long before the protection kicks in."
— Oleh Lukianchuk, UEC Engineer

Warning! Working with electrical equipment is life-threatening!
All work in the electrical panel must be performed only by qualified electricians with the power disconnected. Before starting work, be sure to de-energize the line and verify the absence of voltage with a measuring device.
Key Circuit Breaker Parameters (What the Numbers and Letters Mean)
Rated Current (In): How to Determine the Right Value
Selecting the rating (In) is a balancing act. It must be greater than or equal to the load current (Ib) but less than or equal to the permissible cable current (Iz).
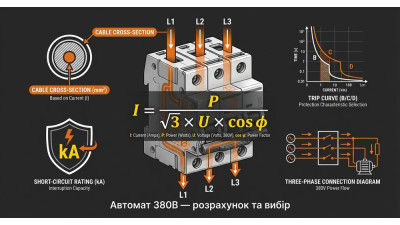
Single-phase current calculation formula:
I = P / U
where P is power in Watts, U is voltage (usually 230 V).
Example:
- Lighting: 10 lamps at 15 W = 150 W. Current: 150 / 230 = 0.65 A. Even 6A would be more than sufficient here.
- Outlets: Heater 2000 W + computer 500 W = 2500 W. Current: 2500 / 230 = 10.8 A. A 10A breaker would be at its limit, so we install 16A.
The detailed algorithm is described in the article about calculating the circuit breaker rating for a 220V network.
Trip Curve: B, C, D (When to Use Each)
The trip curve determines how quickly the breaker will respond to a brief overcurrent (for example, when a vacuum cleaner motor starts).
Trip Curve B — Resistive Loads
Inrush current multiplier: 3–5 × In
Typical application: lighting, heating elements
Risk of nuisance tripping: Low for apartments
Trip Curve C — Mixed Loads
Inrush current multiplier: 5–10 × In
Typical application: outlets, offices, mixed
Risk of nuisance tripping: Medium, universal
Trip Curve D — Heavy Inrush Currents
Inrush current multiplier: 10–20 × In
Typical application: machine tools, heavy-duty pumps
Risk of nuisance tripping: Very low for inrush
If you're unsure about the difference between trip curves B, C, and D, remember a simple rule: B — for "quiet" networks, C — for "standard" ones, D — for industry.
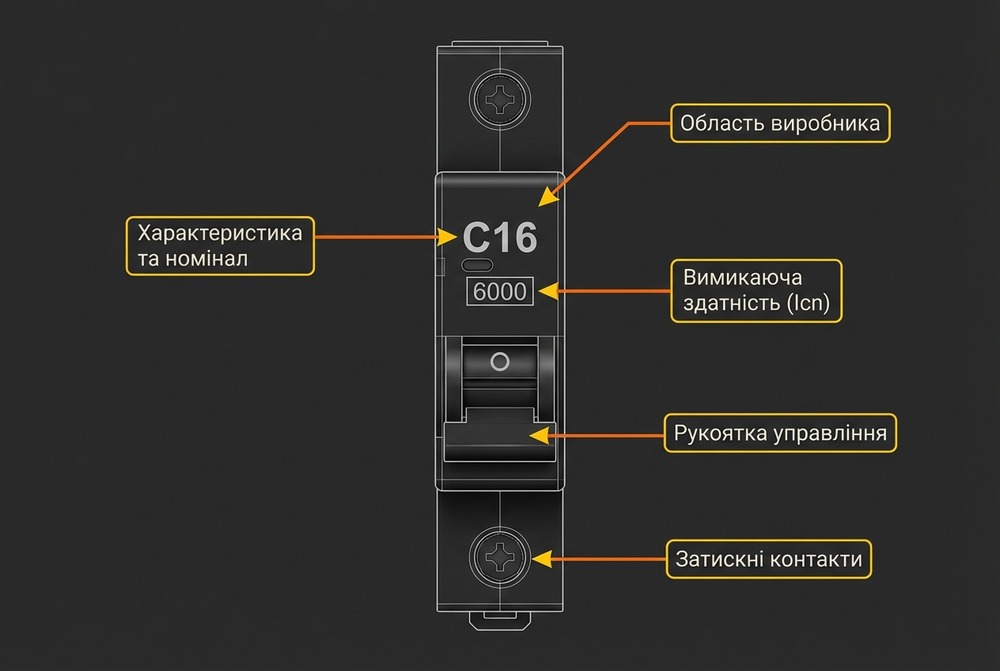
Rated Breaking Capacity (Icn): 4.5 kA vs 6 kA vs 10 kA
This parameter indicates the maximum short-circuit current the breaker can interrupt without melting.
- 4.5 kA: often found in older product lines, suitable for country houses far from a substation.
- 6 kA: the modern standard for residential buildings.
- 10 kA: recommended if your building is right next to a transformer substation, where short-circuit currents can be enormous.
Breaker Hunters note that industrial breakers can have Icn from 50 to 100 kA [4], but for an apartment, all you need to know is: get at least 6 kA (marked "6000" in a rectangle) for peace of mind. Read more about choosing between 4.5 kA, 6 kA, and 10 kA breaking capacity in our review.
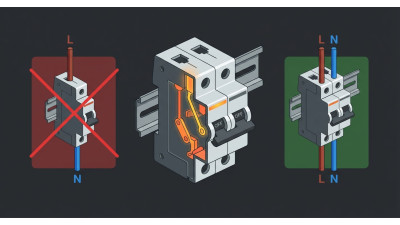
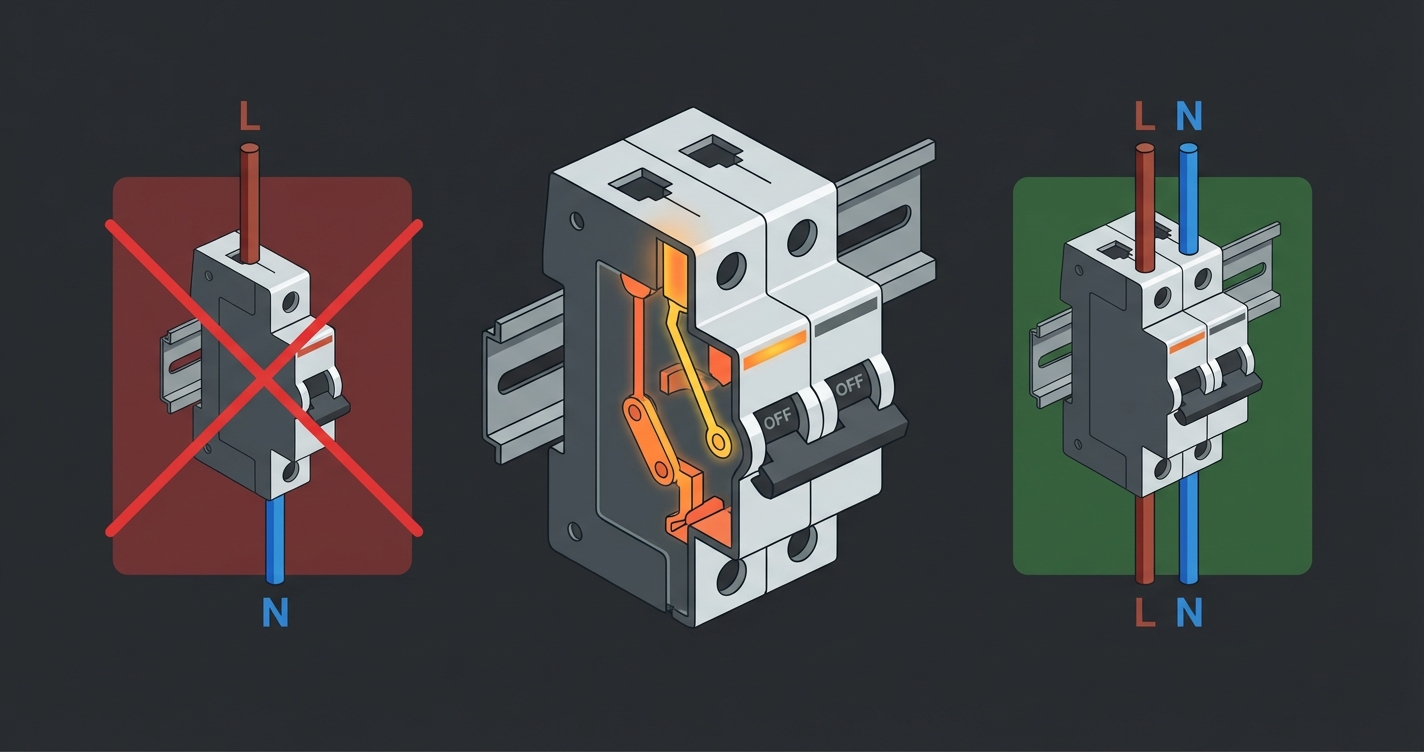
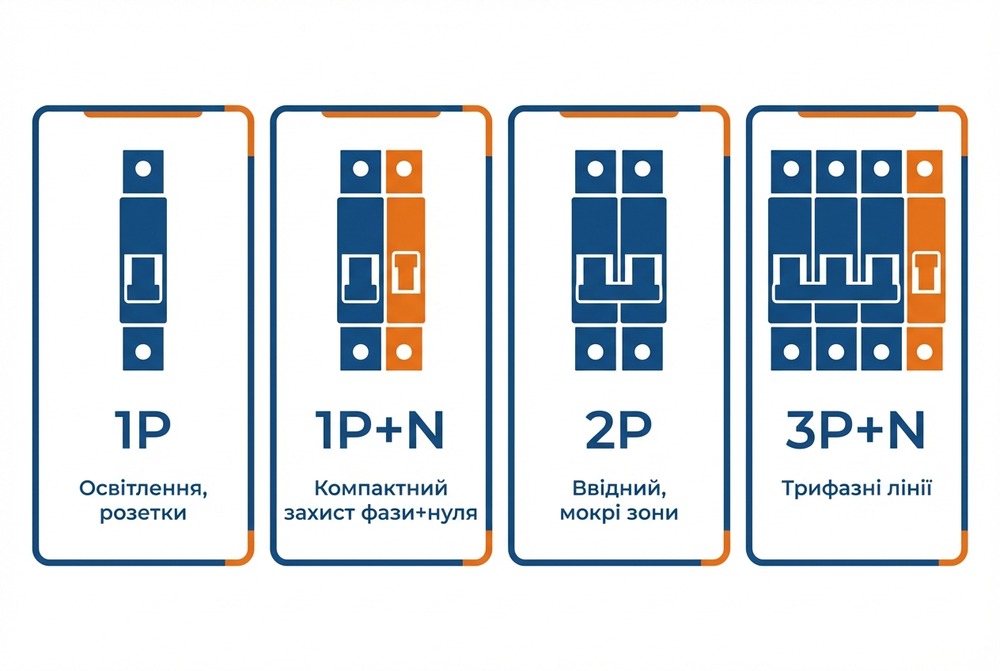
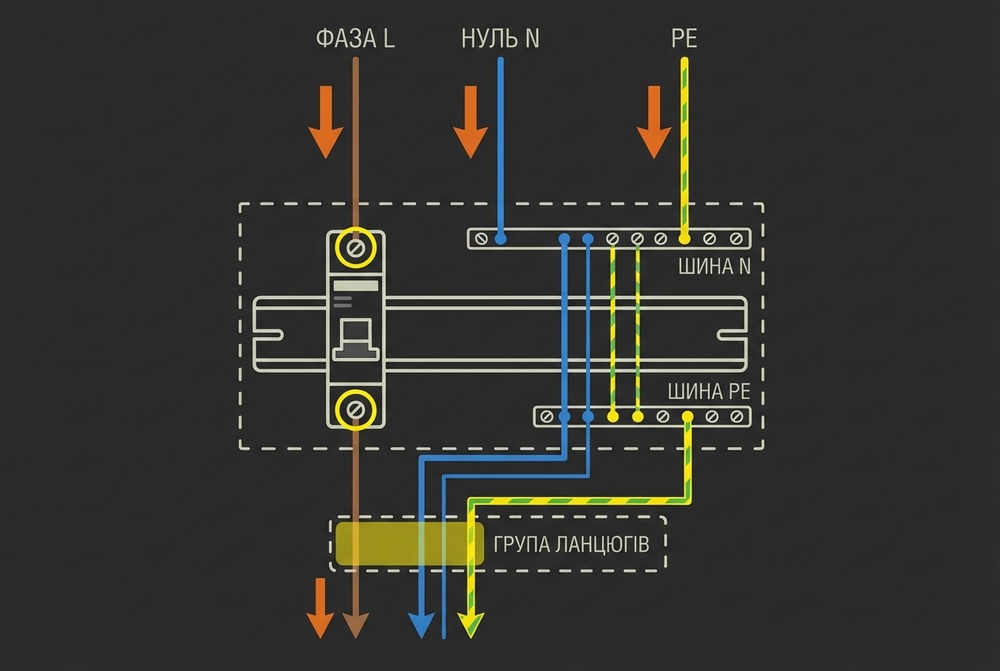
Pole Configuration: 1P, 1P+N, 2P, 3P, 4P — What to Install in an Apartment
For most apartment circuits, single-pole (1P) breakers that disconnect only the phase conductor are sufficient. However, modern standards increasingly recommend (and sometimes require) breaking the neutral as well, especially if the building has a TN-S or TT earthing system. In this case, double-pole (2P) or compact 1P+N breakers are used. We've covered in detail when to install a single-pole or double-pole breaker.
"Single-pole breakers interrupt current in a single, ungrounded (phase) conductor, which is suitable for most lighting circuits"
— Peerless Electronics [1]
Ready-Made Solutions for Apartments: Most Commonly Installed Ratings
If you're not planning complex engineering systems, here's a typical panel configuration (the "gentleman's set"):
Lighting
10A with trip curve B. This covers the needs of most rooms. If your entire apartment uses LEDs and is divided into groups — you can safely install 6A.
Room/Hallway Outlets
16A with trip curve C. This is the standard for 2.5 mm² cable. It allows you to plug in a vacuum cleaner, iron, or computer without issues.
Kitchen and High-Power Consumers
An individual approach is needed here.
- Electric stove / Cooktop: often requires 32A and 6 mm² cable.
- Water heater / Air conditioner: usually 16A, but it's better to allocate them to a separate group so that a water heater malfunction doesn't cut power to the outlets.
Bathroom
This is an area of increased danger. Here, installing an RCD (Residual Current Device) with a leakage current of no more than 30 mA (preferably 10 mA) is mandatory.
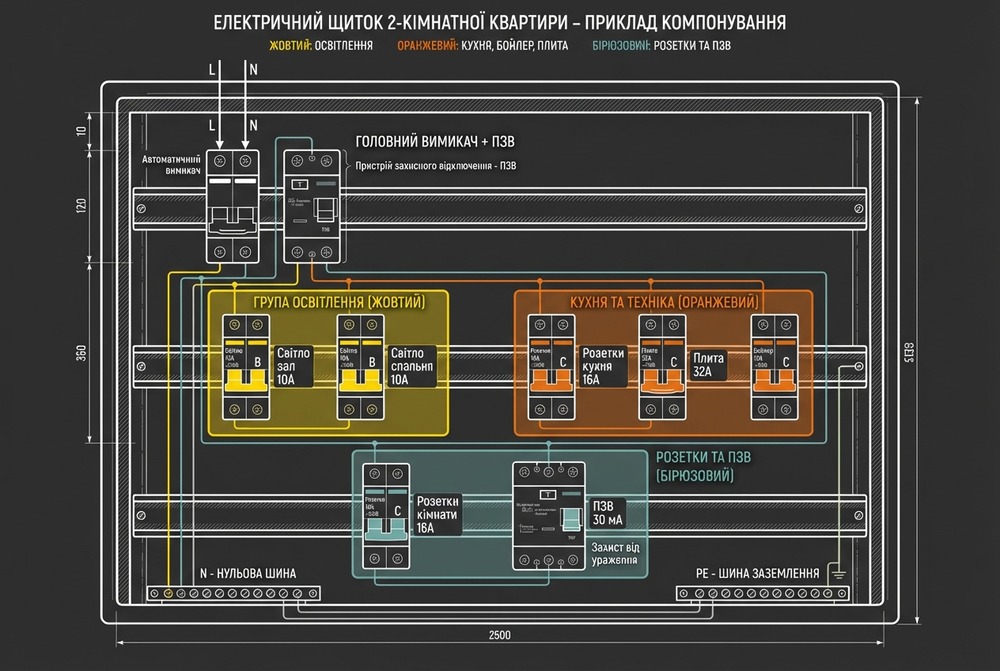
Every project is individual. These recommendations are foundational. Actual ratings depend on cable run lengths, room temperature, and the cable installation method (heat dissipates differently in a wall chase versus in a conduit).
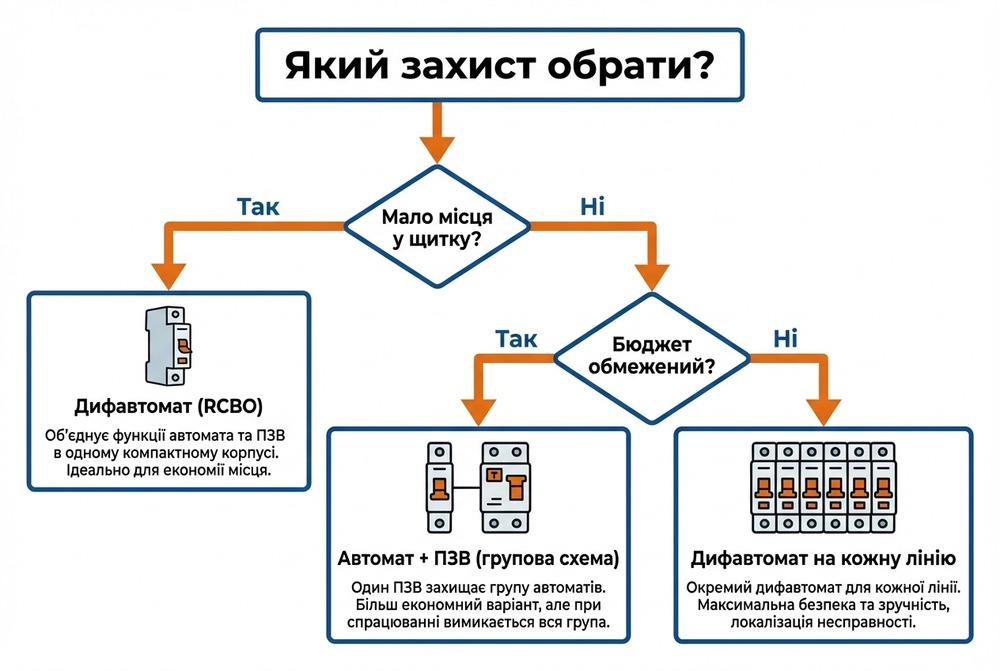
Protection Coordination: Circuit Breaker vs RCD vs RCBO (What to Choose)
A common source of confusion: "What's the difference between a circuit breaker and an RCD?"
- Circuit breaker (MCB): protects the cable from overheating and short circuits.
- RCD (Residual Current Device): protects people from electric shock due to leakage current.
- RCBO: a "2-in-1" device that does both.
Typical Panel Configurations
To save space, you can install RCBOs on every circuit, but this is expensive. A more popular scheme: One RCD per group of breakers. For example, one RCD protects the "Bedroom outlets" + "Bathroom lighting" group.
Read more about modular circuit breakers for apartments and their combination with RCDs in our separate article. By the way, IEC 60364 and national standards clearly regulate the use of residual current protection in wet areas.
Step-by-Step Guide: How to Choose a Breaker for Your Circuit (No "Magic")
- Determine the circuit type: Is it lighting, outlets, or a "heavy-duty" appliance?
- Calculate the load: Sum of power ratings (W) / 230V = Current (A).
- Check the cable: Determine the copper conductor cross-section (1.5, 2.5, 4.0 mm²). This is the main limiting factor.
- Select the trip curve (B/C): B — for apartments (lighting, heating elements), C — if there are motors/power tools.
- Determine pole configuration: 1P — standard, 2P — for complete safety and easier fault finding.
- Select Icn: For an urban apartment — 6 kA (6000).
- Verify selectivity: The main breaker must have a higher rating than the group breakers (e.g., Main 40A -> Group 16A).
"Following the principle of matching rated voltage and current (In ≥ Ib) is the foundation for safe operation"
— Weisho Elec [3]
Brand Comparison (for "What to Buy"): Hager vs Schneider vs ABB vs Eaton vs Gewiss
Choosing a brand is not just about price, but also about the reliability of the mechanism, the quality of the arc-extinguishing chamber, and the contact material.
| Brand | Country / Popular Series | Icn (typical) | Available Curves | Counterfeit Risk | Price Segment |
|---|---|---|---|---|---|
| Hager | Germany (MC, MB) | 6 kA | B / C | Low | Mid-range |
| Schneider Electric | France (Resi9, Acti9) | 6–10 kA | B / C / D | Medium | Mid / High |
| ABB | Switzerland (Basic M, S200) | 4.5–10 kA | B / C | High (verify!) | Mid / High |
| Eaton | US/EU (PL4, PL6) | 4.5–6 kA | C / D | Low | Mid-range |
Always verify the series against the official catalogue. In our work at UEC, we often recommend Italian GEWISS as an alternative to "hyped" brands — they offer industrial-grade quality (Masterpact level reliability, as mentioned by Breaker Hunters [4]) at a mid-range price.
How to Tell an Original Breaker from a Counterfeit (Quick Check)
The market is flooded with counterfeits, especially of popular product lines.
- Weight: An original breaker is heavier due to copper components and the arc-extinguishing chamber. A counterfeit is lightweight because it's "empty" inside.
- Printing: The text should be clear and should not rub off with a finger.
- Terminals: A quality breaker has terminal clamps with serrations to hold the wire and a protective shutter to prevent the cable from falling "behind the clamp."
- Code: Verify the QR code or part number on the manufacturer's website.
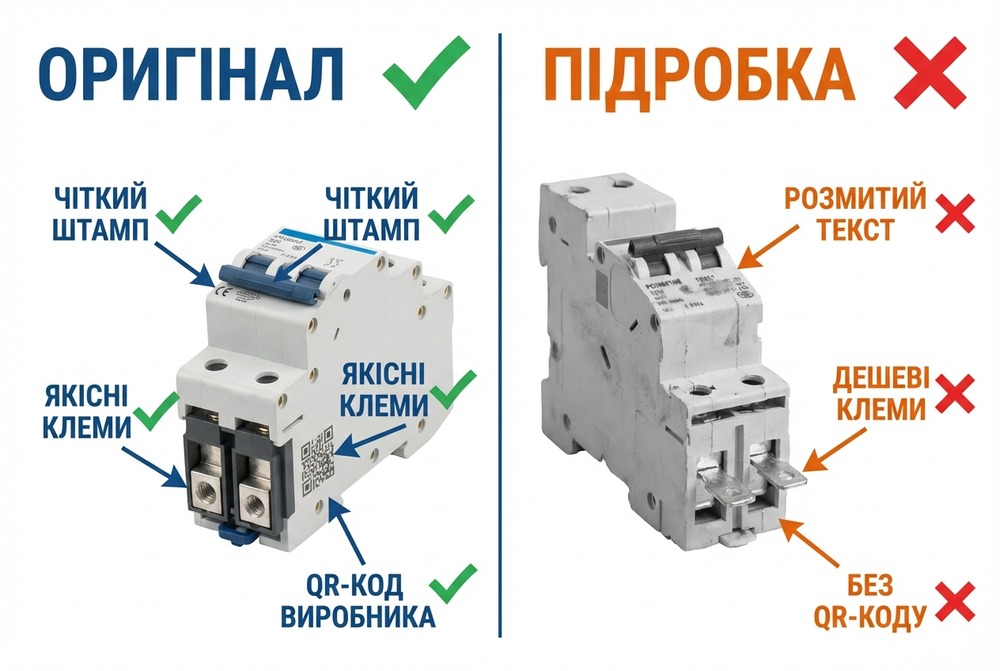
Buying at a bazaar or on an unknown website is a gamble. Stores with direct contracts (distributors https://uec-ua.com/de-kupiti/) are the only protection against counterfeits.
Common Mistakes in Selection and Installation (and Their Consequences)
| Mistake | Symptom | Solution |
|---|---|---|
| Overrated breaker (25A for outlets) | Outlet or insulation melts, breaker doesn't react | Replace with 16A, check cable |
| Underrated breaker (10A for kitchen) | Constant tripping when switching on the kettle | Replace with 16A (if cable allows) |
| Poor contact | Burning plastic smell, sparking in the panel | Tighten terminals (with a torque screwdriver) |
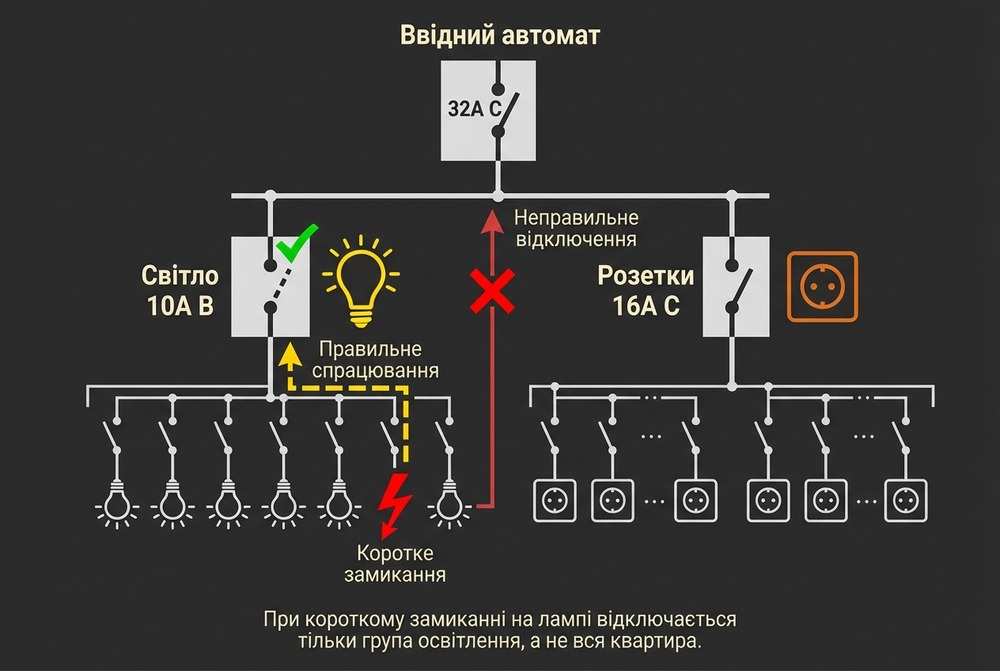
| Single breaker for outlets and lighting | Changing a bulb turns off the refrigerator | Separate the groups (selectivity) |
Special attention to "legacy" installations: if you have aluminium wiring, it requires even lower ratings (for 2.5 mm² aluminium, the maximum is 10–13 A) than copper. "Overrating can lead to circuit damage," warns Peerless Electronics [1] — and this is the golden rule of safety.
Connection and Replacement of Breakers: Basic Safety Rules
This section is for understanding the process, not a "do-it-yourself" instruction. Installation must be performed by a qualified specialist with the appropriate certification.
- Complete de-energization: The main breaker is switched off. The absence of voltage is verified with an indicator.
- Input on top, output on bottom: This is the generally accepted standard (although many modern breakers allow reverse connection, this order simplifies maintenance).
- Tightening torque: An under-tightened contact means heating and fire. Over-tightened means a stripped thread. Professionals use torque screwdrivers (usually 2–2.5 Nm).
Don't forget about "preventive maintenance": screw connections tend to loosen over time (metal creep), so they should be re-tightened once a year, especially in the panel.
Related Products (to Build a Proper Circuit)
A single breaker isn't enough for a reliable circuit. You'll also need:
- Cable: VVGng-LS or NYM (3×1.5 for lighting, 3×2.5 for outlets).
- Comb busbar: for reliable connection of a group of breakers instead of wire "jumpers."
- Labelling: so you don't have to remember which breaker is responsible for what a year later.
FAQ: Circuit Breaker for Lighting and Outlets (Quick Answers)
❓ Can you use a single breaker for both outlets and lighting?
Technically yes, but it's not recommended. It's better to separate the groups for convenience (a burnt lamp — outlets still work) and proper protection, since lighting wires are thinner.
❓ Which breaker is better for outlets: 16A or 20A?
For standard household outlets (Schuko), which are rated for 16A, and 2.5 mm² cable — 16A only. 20A is installed on dedicated circuits with 4 mm² cable.
❓ Which breaker for lighting: 6A or 10A?
For a modern apartment with LED lighting, 6A is often sufficient (1.3 kW of power). 10A (2.2 kW) is the universal option for larger rooms.
❓ 4.5 kA or 6 kA: which to get for home?
For an apartment in a multi-storey building, choose 6 kA (Icn). This is the modern safety standard.
"A protective device must operate at 100% of the required load but must not exceed the cable's safety limits"
— c3controls [7]